Arcentry - Development Setup Guide
This guide is targeted towards developers working with Arcentry's code-base. If you are an end-user, please consult the REST-API and Api-Docs documentation instead. If you are an enterprise customer, please find information in the Enterprise section of the documentation.
This guide will show you how to setup Arcentry's backend and frontend on a Windows computer.
Prerequisites
NodeJS 10.x
Arcentry is developed and compiled using Node 10.x.x - this doesn't mean it isn't forwards compatible with later versions of node, but it is currently untested on these. To install Node 10.19.0 download the installer and run through the installation process with all default options ticked.
Yarn
Yarn is a package manager for Node, developed by Facebook. To install it, navigate to https://classic.yarnpkg.com/en/docs/install/#windows-stable and download and install the latest stable version .
PostgreSQL
Arcentry's data is stored in the Postgres Database. In addition, Arcentry makes heavy use of Postgres Scripts, written in PL/pgSQL, Postgres' scripting language.
To download Postgres, navigate to https://www.postgresql.org/download/windows/ and download the latest version of PostgreSQL (min required version for Arcentry is 9.6). Install it with all default options ticked. During installation, you'll be asked to set the password for the postgres superuser - don't forget to write it down!
Either Git or Cygwin
All build-scripts associated with Arcentry are written in bash/shell. To use them in Windows, either install Git (recommended) or Cygwin. For this guide, we'll assume a Git installation.
To install Git, navigate to https://git-scm.com/download/win which will automatically download the latest version. Install with all default options checked.
(To install Cygwin, navigate to https://cygwin.com/install.html)
Installation
Alright, time to install Arcentry itself. Here are the steps:
Download and unzip arc-frontend and arc-enterprise. Make sure you have two folders called arc-frontend and arc-enterprise in the same folder that directly contain the code. If your folders are called arc-frontend-master or arc-enterprise-master, rename them.
Installing the Frontend
Navigate to arc-frontend/src
Right click the folder background and select Git Bash Here
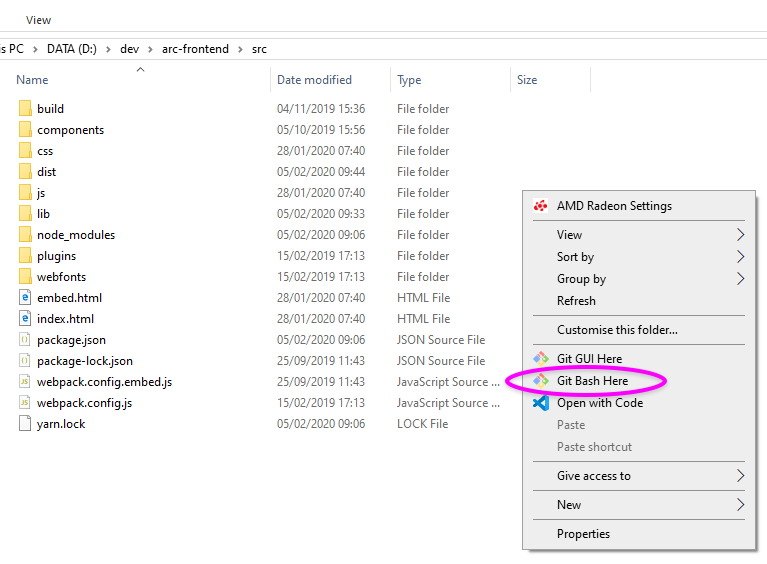
In Git Bash, run the following commands, line by line
npm install -g webpack@3.5.5
npm install -g webpack-cli@3.3.11
npm install -g webpack-dev-server@2.7.1
mkdir dist
npm run bundle
yarn
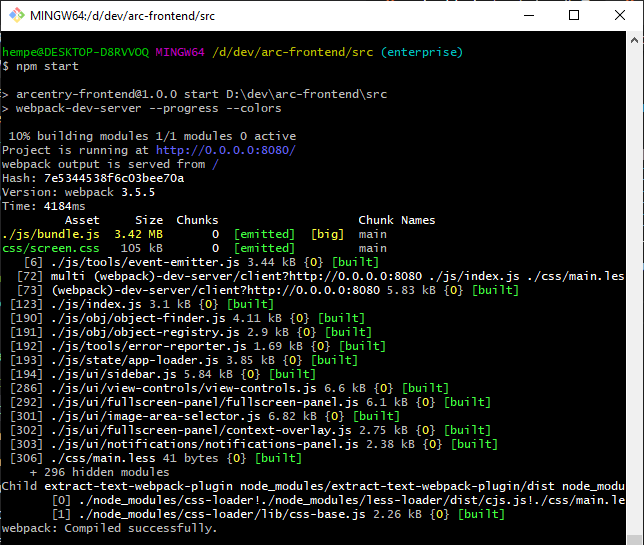
npm start
If everything worked, you should see output similar to:
Installing the Backend
Navigate to src/arc-enterprise and simply run
yarn
Database Setup
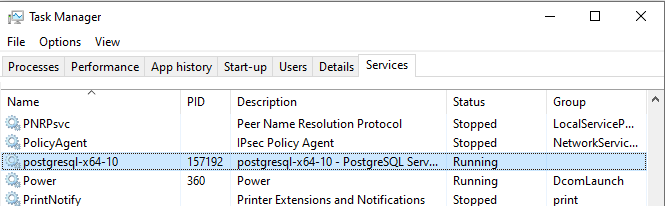
First, make sure the database is running. Postgres installs as a Windows Service - so bring up the taskmanager with Ctrl+Shift+Esc and switch to the Services tab. Look for postgresql-x-64-10 and make sure its running.
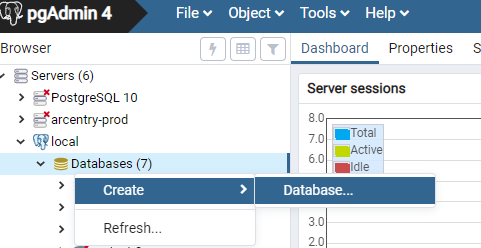
Installing Postgres should have also installed a tool called "PgAdmin". Run it from the start menu and allow it to open in Chrome. In PgAdmin, connect to an instance called local in the sidebar on the left, using the username postgres and the password you've set up during installation.
Once connected, right click local and select Create and Database
Choose any name you like for your database and click save. That's it, the rest of the database setup will be performed automatically once you start arc-enterprise.
Configuring the Backend
During development, backend configuration resides in arc-enterprise\src\arcentry-conf-test.yml. Open this file and set the following settings.
# Postgres Connection Info
dbHost:	localhost
dbPort:	5432
dbUser:	postgres
dbPassword: YOUR_DB_PASSWORD
dbDatabase: YOUR_DB_NAME

# Authentication
authType: internal # can be internal, webhook or azureAdJwt
showSignupForm: true
showLoginForm: true
canResetPassword: false
Starting the Backend
Time to start up the backend and allow it to set up the database. In git bash, navigate to arc-enterprise and run:
npm start
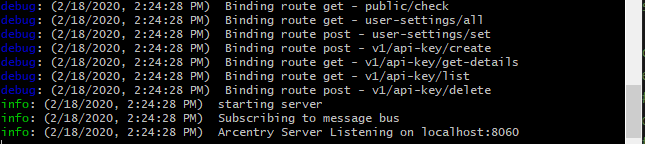
If the end of the resulting log looks as follows, your backend is running:
Accessing the App
First, create an initial user account. To do so, stop the arc-enterprice process once more and run the following command in the arc-enterprise directory, then start arc-enterprise again with npm start.
 node src/index.js \
--config src/arcentry-conf-test.yml \
--create-admin \
--email user@test.com \
--password sesame
Phew - we're almost there. All that's left is to open the arc-frontend app in a browser, connected to arc-enterprise as its backend. But there's a problem: By default, arc-enterprise serves a pre-bundled and minified production version of arc-frontend under the same URL as its backend services.
During development, however, we want to non-minified arc-frontend version - but talking to arc-enterprise as its backend. That means that arc-frontend and arc-enterprise will run on different ports - and that means requests will be blocked due to CORS (Cross-Origin-Resource-Sharing) policies.
To get around this, we run Chrome with CORS disabled during development. To do so, create a file called e.g. no-cors-chrome.bat and paste the following content (assuming your chrome executable is at C:\Program Files (x86)\Google\Chrome\Application\:
taskkill /F /IM chrome.exe
cd C:\Program Files (x86)\Google\Chrome\Application\
chrome.exe --disable-web-security --user-data-dir=C:\chrome-tmp
In your new, CORS-free Chrome instance, navigate to http://localhost:8080/?api-root=http://localhost:8060/api/&image-root=http://localhost:8060/user-images/. After a few seconds, you should be greeted by a "not logged in" warning. No problem, let's log in with our newly created user. To do this, open Chrome's console with Ctrl+Shift+J and enter:
Vue.http.post( 'account/login', { email: 'user@test.com', password: 'sesame'})
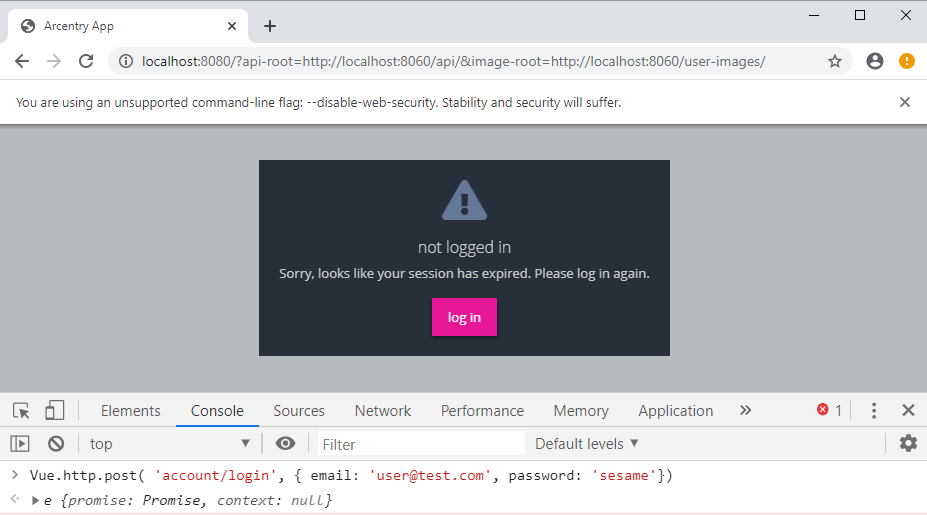
Refresh the page and Arcentry should be up and running, talking to its own backend and database.
Phew...that was quite something. Thanks for sticking around with me all the way to the end :-)